A simple guide to Reinforcement Learning

This is the first post in a series of articles on Reinforcement Learning which is a subfield of Machine Learning on that we have blogged about before.
Machine Learning is all about having a piece of software learn to solve tasks that it was not explicitly programmed for. Instead, it learns by observing data with the goal to find patterns that it can generalize into certain rules. In other words, instead of having to explicitly define rules using traditional programming constructs such as conditions, loops or function calls, we’ll let a machine figure out those rules in an automatic iterative process.
Most forms of Machine learning still relies on human input though. In particular, humans are needed to select and provide lots of data for the machine to learn from. In contrast, Reinforcement Learning takes the idea another step forward. Instead of providing datasets, we let the machine take actions in the environment that we want it to master and give it feedback on its actions in the form of rewards or punishment. In other words, the machine has no clue about the task it is trying to solve. It basically starts acting randomly at first, but develops a policy to solve the task over time. Doesn’t that sound exciting?
A word of warning
This post aims to provide an easy entry for beginners who are new to Reinforcement Learning or even Machine Learning in general. We may oversimplify or sacrifice performance in certain areas to achieve this goal. We’ll also choose a simpler vocabulary over a more scientific one whenever possible.
In this article we want to learn the basics of Reinforcement Learning using a simple Q-Table approach. Don’t worry if that doesn’t ring a bell yet. We’ll learn what all of this means as we go.
We’ll be taking things further in follow-up articles in which we’ll do Deep Reinforcement Learning using a neural net instead of the Q-Table. Step by step we’ll learn about the explore-exploit dilemma, replay memory and many other exciting things. But let’s start simple!
Defining a simple game
As our main goal is to learn Reinforcement Learning, let’s keep the actual task that we want our machine to learn as simple as possible. In fact let’s just make up a simple math game ourselves! We’ll call it “Catch 5” and these are the rules:
- Every game starts by revealing a random number between 1 and 12 with the exception of the number 5 that will never be the starting point.
- From that given starting point, it is our goal to get to number 5 by simple addition/subtraction. However, we can only choose from the following six actions: Add 3, Add 2, Add 1, Subtract 1, Subtract 2 and Subtract 3
- We can only play a maximum of three turns. If we don’t get to 5 within three turns, we have lost the game. Since the starting number is between 1 and 12, it is always possible to win the game if we don’t screw up the basic math :)
Our game may turn out like this and we win in two turns.
Game: Starting number is 9. Catch 5!
Player: playing -3
Game: You played -3, now at 6. Catch 5!
Player: playing -1
Game: Caught 5! You won in 2 turns.
However, keep in mind that our machine has no idea about the rules of the game at first and basically just “sees” six buttons without any description on how to play. It doesn’t even know it’s playing a game, so it may act like the following and lose.
Game: Starting number is 9. Catch 5!
Player: playing +3
Game: You played +3, now at 12. Catch 5!
Player: playing -1
Game: You played -1, now at 11. Catch 5!
Player: playing -3
Game: You played -3 with your last move. Now at 8. You lost!
We didn’t manage to get to number 5 within three turns, which means we have lost the game. But how is our machine going to find out how to win the game if we don’t explicitly teach it how to play?
A Q-Table to the rescue
As we can see our game isn’t that complex and we may wonder what’s the point of such a silly toy task. It turns out that a simple task like this makes it very easy for us to explore the topic and enables us to visualize the states and their possible actions in simple graphics.
Notice that the 5 is a special state here as it is the final winning state from which no further action can be done.

Let’s ignore the fact that our defined rules would allow to also reach numbers above 12 or below 1. Even if we allow these states to happen, they don’t change the principles of what we are about to learn.
Our main takeway for now should be, that we can think of our game as a defined space of states where we can take six possible actions from every single state.
The thing that we want our machine to learn is a mapping from every possible state to its best possible action. Let’s assume the best strategy to win this game would be to always move with the biggest possible step towards the number 5. We could visualize the entire state space and their best actions as seen in the following animation.
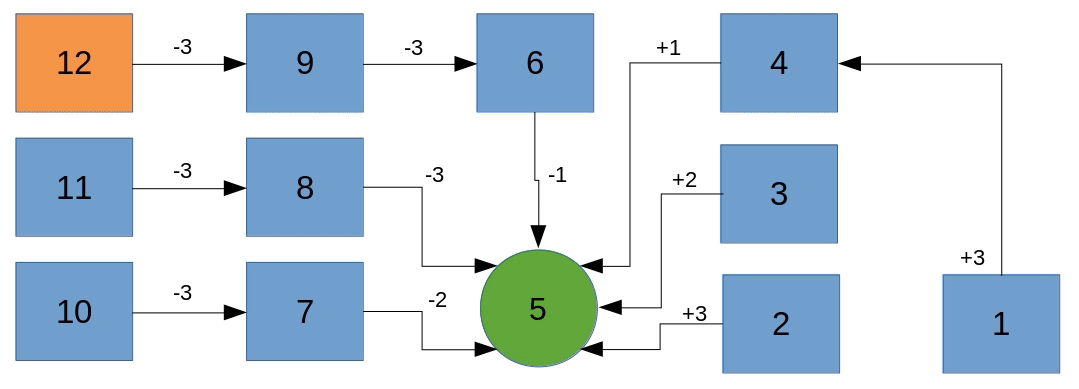
For instance, starting at 12, the best move we could do is to play -3 which takes us to 9, from where we play -3 again, which takes us to 6, from where we play -1 and win the game in three turns.
Obviously, our strategy isn’t the only one to win the game. Given a starting point of 9 for instance, we could play -3 followed by -1 or we could play -2 followed by -2 or even -1 followed by -3. Each of these pairs of actions would make us win the game in two turns. That is perfectly fine, in fact, we don’t know yet what kind of policy our machine will develop to figure out how to win this game.
The most important learning up to this point should be that our machine can develop a mapping of states to rated actions. Such a mapping is called a Q-Table.
For instance, looking at state 9 we can easily imagine that the machine develops a strong sympathy towards playing -3 indicated in red with the other possible actions having a less strong indication of being the best action.

The complete Q-Table contains all possible states and their rated possible actions. Once the machine has developed such a mapping, it can simply lookup the current state in the table and perform the action with the highest rating. It repeats this process for each turn until it wins the game.
Obviously, this approach does only work if the entire state space is small enough to be represented as such a simple table. But let’s not get ahead of ourselves.
Ok, so we know we want our machine to develop such a Q-Table. But how does that work?
Creating the environment, the game
As we’ve spoiled in the beginning, Reinforcement Learning is about machines acting in an environment and receiving positive or negative rewards to eventually learn a policy to solve a task.
Let’s begin by creating the environment - the game - that our machine will be playing.
The game is already implemented in the demo above. Notice that the interactive demo is written in TypeScript and runs on stackblitz.com. For the rest of the article and the follow-up articles, we’ll be using Python since it has a great ecosystem for Machine Learning. For demos we’ll be using machinelabs.ai which is the perfect platform for these kind of tasks.
Rest assured, the code is equally simple no matter whether we’ll be using TypeScript or Python!
class Game():
  def __init__(self):
    self.reset()

  def reset(self):
    self.current_number = random.randrange(1, 12)
    if (self.current_number == 5):
      self.reset()
    self.turns = 0

  def has_lost(self):
    return self.turns >= 3 and self.current_number != 5

  def has_won(self):
    return self.turns <= 3 and self.current_number == 5

  def is_active(self):
    return not self.has_lost() and not self.has_won()

  def play(self, action: Action):

    if (self.turns >=3):
      raise Exception('Max number of turns reached. Call reset.')

    self.turns += 1;
    self.current_number += int(action)

    return self.has_won()
There are really only two basic requirements that we have for the API of the game:
- A
playmethod that takes an action and applies it to the current state. This is the most important API as it will control the game and move us from one state to another. has_won()/has_lost()methods to figure out if we have won or lost the game. These APIs are important to gather feedback to learn from.
We’ve also added some other APIs for convenience but the listed APIs are really the only crucial ones for our mission.
Building the agent
There are multiple actors in Reinforcement Learning. We’ve already build a simple game, which serves as the environment, that we want our machine to act in.
In order to play the game we need an agent that will perform actions in the game with the intention to figure out how to win the game over time.
We’ll start with something really simple and implement two methods, namely play and play_and_train. The play method basically lets the agent play the game for a given number of times in a mode where we can follow the visual output.
# creating random actions
def get_action(self):
  return random.randrange(0, 6)

# mapping actions (0, 1, 2, 3, 4, 5) to answers (3, 2, 1, -1 , -2, -3)
def action_to_answer(self, action):
  return actionMap[action]

def play(self, num_times):
    for nb_game in range(1, num_times + 1):

      self.game.reset()
      print('Starting game #{nb_game}'.format(nb_game=nb_game))
      while (self.game.is_active()):
        print('Current number is {current_number}'.format(current_number=self.game.current_number))
        action = self.get_action()
        human_readable_answer = self.action_to_answer(action)

        print('Playing {answer}'.format(answer=human_readable_answer))
        self.game.play(human_readable_answer)

        if (self.game.has_won()):
          print('You won!')

        if (self.game.has_lost()):
          print('You lost')

      print('##############################################')
As you can see, there’s no rocket sience behind it. A simple loop for the number of times we want our agent to play and an inner loop for the game itself to make turns as long as the game isn’t either won or lost.
Also notice that we are mapping the human readable answers (+3, +2..-2, -3) to zero based values (0, 1..4, 5) so that we can easily address them as indexes in an array to make our life much easier.
Since our agent is just making random moves, we should’t expect super powers either. Here’s some output from it playing randomly. It even won game #4 by accident. Hooray! For this simple game though we’d really want our agent to win 100% of the games!
Starting game #1
Current number is 7
Playing 1
Current number is 8
Playing 2
Current number is 10
Playing 3
You lost
##############################################
Starting game #2
Current number is 10
Playing 1
Current number is 11
Playing 1
Current number is 12
Playing -2
You lost
##############################################
Starting game #3
Current number is 1
Playing 3
Current number is 4
Playing -2
Current number is 2
Playing -2
You lost
##############################################
Starting game #4
Current number is 7
Playing -2
You won!
##############################################
We’ll keep the play method to have an API that we can call that gives us visual feedback when the agent plays the game.
As we mentioned we’ll also implement a play_and_train method which will play in a headless mode, meaning we won’t be able to follow along the moves. Instead, we’ll get live metrics to follow along how the actual training is working out. For instance, we’d like to count the number of won or lost games.
Let’s take a look how play_and_train is implemented.
def play_and_train(self):
  stats = TrainStats()

  for epoch in range(1, self.config.nb_epoch + 1):

    self.game.reset()
    stats.epoch = epoch

    while (self.game.is_active()):

      state = self.game.current_number

      action = self.get_action()
      human_readable_answer = self.action_to_answer(action)

      self.game.play(human_readable_answer)

      reward = self.get_reward()
      next_state = self.game.current_number
      final = not self.game.is_active()
      self.train(state, action, reward, next_state, final)

      if (self.game.has_won()):
        stats.nb_wins += 1

      if (self.game.has_lost()):
        stats.nb_losses += 1

    stats.p_wins = 100 / epoch * stats.nb_wins
    stats.p_loss = 100 / epoch * stats.nb_losses

    if (epoch % self.config.print_every_n_epoch == 0):
      self.print_epoch_stats(stats)
It’s really not that much different. Instead of printing out each and every move, we’ll collect stats to print out at a given frequency. Also notice that we slightly changed the wording: From now on, we’ll be calling the number of times that our agent plays the game epochs which is the general term for a complete training cycle.
Collecting the precious bits
The eagle-eyed reader may have spotted that there are in fact some subtle changes that are quite important. We collect five important variables that we are passing to a new train method on our agent.
Let’s take a closer look at what these things are:
- The
stateis just the current number of the game before we take our action. For instance, this may be the number9. - The
actionis simply the move that our agent performed on thestate. For instance, playing-2is an action in our game. Notice however that we internally represent these actions with the numbers0to5and just map them to their human readable values (3..-3) when we invokeplayon the game. - The
next_stateis the current number of the game after we took our action. If thestatewas9and the action was-2thenext_statewill be7. - The
finalvariable isTruewhen the game is either won or lost andFalsewhen the game is still active. - The most important variable that we haven’t yet talked about is the
reward. At the end of the day, this is what enables our agent to learn at all. We’ll get the reward by callingself.get_reward()and we’ll take a look at the implementation in the next section.
The reward function
As mentioned, the reward function is one of the most important things to design in a Reinforcement Learning system. It will heavily influence the policy that our agent will learn.
It’s out of the scope of this article to discuss this in detail. Fortunately designing the rewards should be pretty straight forward and easy to follow for our simple task.
Remember that this is the function we call after our agent performed an action.
def get_reward(self):
  if self.game.has_won():
    return 1
  elif self.game.has_lost():
    return -1
  else:
    return -0.1
As we can see, we return a positive reward of 1 when our agent won the game, a negative reward of -1 when it lost the game and a negative reward of -0.1 for every action that didn’t directly lead to winning or losing the game. In other words, every action is penalized with a slightly negative reward of -0.1. This makes sense if we keep in mind that it is our goal to win the game in a maximum of three turns. So even if we consider that we have to make at least one turn per game, turns can be considered costly overall which is essentially what we price in here.
Updating the Q-Table
Ok, so let’s see how we can build up this Q-Table that we talked about before. Remember we are calling self.train(state, action, reward, next_state, final) and by now we should have a clear understanding what each parameter represents.
Before we move on, let’s create a new instance member on our agent called qtable. We’ll initialize it as an empty hash map. Remember that we said the Q-Table basically maps states to rated actions. Naturally these things can well be represented as hash maps.
self.qtable = {}We will also create a new method ensure_qtable_entry which takes care of creating entries in our qtable in case they don’t exist yet.
def ensure_qtable_entry(self, state):
  if state not in self.qtable:
    self.qtable[state] = np.zeros(6)
Notice that the key is the state itself and the value is a numpy array with six entries initialized to 0, each representing one of our six possible actions. If the term numpy array is new to you, just think of an array with a super powerful API.
With that in place, let’s unveil what happens inside the train method.
def train(self, state, action, reward, next_state, final):

  self.ensure_qtable_entry(state)
  self.ensure_qtable_entry(next_state)

  if final:
    q_value = reward
  else:
    next_state_actions = self.qtable[next_state]
    next_state_max = np.amax(next_state_actions)

    q_value = reward + self.config.discount_factor * next_state_max

  self.qtable[state][action] = q_value
The first two lines are just to ensure we have entries in the qtable for the values at state and next_state as we are about to work with them.
The real hot sauce is in the very last line of the method. Here we can clearly see that we are mutating the rating of the action that we took on the state. This makes perfect sense because, again, we want to build up a map of rated actions for each state so that the agent can lookup the best possible action for each state when it plays the game. We call this value the q_value.
This brings us to the question, how do we calculate the q_value? This is in fact a difficult question to answer because if we think back about our rewards we remember that only the final winning or losing state gives pretty clear rewards of +1 or -1. All the other moves that don’t immediately cause the game to be won or lost, such as playing -3 on a 9, just yield us a negative reward of -0.1.
We somehow have to find a way to consider that when we calculate the q_value. Remember that we want -3 to become an action with a high q-value for state 9. On the other hand we don’t want -3 to get a strong q-value for state 6 as clearly playing -1 would be better and make us win the game from here.
In other words, what we need is a formular that not only takes the immediate reward into account but also the rewards that are yet to follow if we choose the given action from here. We call that the discounted future reward.
The formular for that is hiding in this innocently looking if / else block.
if final:
  q_value = reward
else:
  next_state_actions = self.qtable[next_state]
  next_state_max = np.amax(next_state_actions)

  q_value = reward + self.config.discount_factor * next_state_max
It says that if we reached a final state (won or lost) the q_value should simply be the reward. This makes a lot of sense because there is no future reward to expect from subsequent actions simply because there are no further actions possible from here.
If, however, we aren’t in a final state we do the following:
- We get the the highest q-value for the
next_state. Remember thenext_stateis the state that we shifted to as we applied theactionto thestate. In other words, if the state was9and the action was-3thenext_stateis6. We don’t care which action of thenext_statehas the highest q-value, we simply want get the value to use it in our formular. - We calculate the new
q_valuefor theactionof thestateas therewardplus the highest q-value of thenext_statemultiplied by some mysteriousdiscount_factor. Let’s ignore thediscount_factorfor a moment and just think of it as being set to1. Replacing our variables with concrete numbers this may boild down toq_value = -0.1 + 1 * 1.
By now, you may be wondering: “But how does that achieve the learning? There’s no guarantee that the q-value for the next_state makes any sense?!”
You’re kinda right, the q-values won’t be perfect from the beginning. In fact, they may start out completely wrong. What this formular achieves though is that the values approximate and get more and more accurate with every iteration.
Getting back to the discount_factor, this thing is less scary than we may think. The discount_factor should be set between 0 and 1 and will influence how much we care about future rewards. A discount_factor of 0 means that we eleminate the righthand side of our formular entirely and don’t price in any future rewards. On the other hand, a discount_factor of 1 means that we strongly care about future rewards. A value of 0.9 is usually a good start but since our task is completely deterministic we can also set it to 1.
The nice thing about using such a terrible simple toy task is that we can make this process perfectly visible. We can simply print out the Q-Table at different stages of the learning.
print(self.qtable)This is what the Q-Table looks like after our agent played the game 10 times.
{
    # actions go from +3, +2, + 1, -1, -2, -3
    0: array([0., 0., 0., -0.1, 0., -1.]),
    1: array([0., 0., 0., -0.1, 0., 0.]),
    2: array([0., -0.1, -0.1, 0., -1., 0.]),
    3: array([0., 1., 0., -0.1, 0., -0.1]),
    4: array([0., 0.673289, 0., 0.89, 0., 0.]),
    5: array([0., 0., 0., 0., 0., 0.]),
    # it is in favor of playing -2 from here. Stupid machine!
    6: array([-1., 0., 0., 0., 0.7811, -0.1]),
    7: array([-1., -0.1, 0., 0., 0., 0.]),
    9: array([0., -0.1, -0.1, 0., 0., 0.]),
    10: array([0., -0.1, -0.1, 0., 0., -0.1]),
    11: array([0., -1., 0., 0., 0., 0.]),
    12: array([0., -0.1, 0., 0., 0., 0.]),
    13: array([0., 0., 0., 0., 0., 0.]),
    14: array([0., 0., 0., 0., 0., -1.]),
    -2: array([0., 0., 0., 0., 0., 0.]),
    -3: array([0., 0., 0., 0., 0., 0.]),
    -1: array([0., 0., 0., -1., 0., 0.])
}
Each line represents a state with the right-hand side being the array of q-values for each action starting at 3 and ending at -3. Notice how the machine “thinks” playing a -2 on a six would be the best move. We need to give it some more training cycles!
And after 100 games the Q-Table looks like this. By now, the agent has figured out how to play perfectly. Also notice that the entire Q-Table grow a bit as it figured out how to get to exotic states such as 20 or -7.
{
    # actions go from +3, +2, + 1, -1, -2, -3
    0: array([-1., 0.89, 0.7811, 0.7811, -1., -1.09]),
    1: array([0.89, 0.89, 0.89, 0.7811, -1., -1.]),
    2: array([1., 0.89, 0.89, -1., -1., 0.7811]),
    3: array([0.89, 1., 0.89, 0.89, -1., -1.]),
    4: array([0.89, 0.89, 1., 0.89, 0.89, 0.7811]),
    5: array([0., 0., 0., 0., 0., 0.]),
    # it figured out to play -1 from here
    6: array([-1., -1., 0.89, 1., 0.89, 0.89]),
    7: array([-1., 0.7811, 0.89, 0.89, 1., 0.89]),
    8: array([0.7811, 0.7811, 0.7811, 0.89, 0.89, 1.]),
    9: array([0.673289, -1., -1., 0.89, 0.89, 0.89]),
    10: array([0.673289, -1., -1., -1., -1., 0.89]),
    11: array([-0.199, -1., 0.56655611, 0.7811, 0.7811, 0.89]),
    12: array([-1.09, 0.673289, -1., -1., 0.7811, -1.]),
    13: array([-1.09, -1.09, -1., -1., -1., 0.7811]),
    14: array([-0.1, -1.09, -1.09, -1., -1., -1.]),
    15: array([-1., -1., -1., -1., -1., -1.]),
    16: array([-1., -1., -1., -1., -1., -1.]),
    17: array([-1., -1., -1., -1., -1., -1.]),
    18: array([0., 0., 0., 0., 0., 0.]),
    19: array([0., 0., 0., 0., 0., 0.]),
    20: array([0., 0., 0., 0., 0., 0.]),
    -2: array([0.7811, 0.7811, -1.09, -1., -1.09, -1.]),
    -8: array([0., 0., 0., 0., 0., 0.]),
    -7: array([0., 0., 0., 0., 0., 0.]),
    -6: array([0., 0., 0., 0., 0., 0.]),
    -5: array([-1., -1., -1., -1., -1., -1.]),
    -4: array([-1., -1., -1., -1., -1., -1.]),
    -3: array([-1., -1., -1., -1., -1., -1.]),
    -1: array([0.89, -1., -1., -1., -1., -1.09])
}
Notice that the Q-Table righfully favors playing -1 on a 6 now. All the other moves seem to make sense as well.
Playing with the trained agent
It’s really cool and handy that we are able to validate the learning simply by looking at the Q-Table. But of course we don’t want to stop here. We want to truly measure wether our agent wins every single game.
Notice that our agent explored the game entirely by making random moves so far. This is only possible because the entire state space of our task is very small. For real world tasks this strategy wouldn’t take us very far and we have to refine the approach, but that’s a story for another post.
Still, to measure the performance of our agent, we have to be able to control wether it chooses actions randomly or based on Q-Table lookups.
A simple condition would do the trick but we can do a litle better and introduce a randomness_rate to make fine grained adjustments so that, for instance, 70 % percent of the actions are choosen randomly and 30 % based on Q-Table lookups. This will already pave the way for other optimizations that we’ll be applying in a future post.
We just have to apply a tiny refactoring to our get_action method to pass in the state and then return an action randomly or based on a Q-Table lookup depending on the randomness_rate.
def get_action(self, state):
  if not self.should_go_random() and state in self.qtable:
    return self.predict_action(state)

  return self.get_random_action()

def should_go_random(self):
  return np.random.rand() <= self.randomness_rate

def get_random_action(self):
  return random.randrange(0, 6)

def predict_action(self, state):
  return np.argmax(self.qtable[state])
A randomness_rate of 0 means that all actions should be based on Q-Table lookups (unless the Q-Table is lacking the entry) whereas a value of 1 means that all actions should be choosen randomly. We can choose any value in between 0 and 1 such as 0.3 so that 30 % of the actions are picked randomly.
With that in place we can first perform 100 epochs of training and then have the trained agent play 1000 games.
config = AgentConfig()
config.nb_epoch = 100
agent = Agent(config)
agent.play_and_train()

#play 1000 games on the trained agent
config.nb_epoch = 1000
agent.randomness_rate = 0
agent.play_and_train()
We can see that it really wins every single game out of 1000.
Epoch: 1000 Wins: 1000 (100.00%) Losses: 0 (0.00%)We can also see that it’s not always going for the straight path that we would expect it to take.
Starting game #2

Current number is 10
Playing -1
Current number is 9
Playing -1
Current number is 8
Playing -3
You won!
##############################################
However this is just becaue it was trained on 100 randomly played games. We could increase the number of games the agent performs for the training or fine tune our training strategy to fix that!
Play with the code, fork it and try solving other challenges!
Wrapping up
Phew! This was quite a long post. Congrats if you made it this far. We hope you had fun exploring the exciting field of Reinforement Learning. As mentioned in the beginning, this is part one in a series of articles on Reinforcement Learning. Stay tuned!
